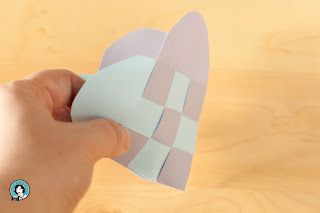
Traditionally, this is something Norwegian children make at Christmas, and they hang them on the Christmas tree and fill them with sweets, so it's something you can make again, if you want a little Scandinavian festive cheer in your house next December. It's also very easy to make - so if you've got kids, this is a great little craft project for them to try too. I've tried to explain how to do it as best possible, but I've illustrated it, so the it should be fairly clear, even without my garbled explanations!
I think it's something you could even consider for decorating a wedding if you wanted to - perhaps make a garland with them. I think they've got lots of scope and possibilities for decorative use.
So here's what you'll need:
- Scissors;
- Scrap paper;
- A pencil;
- A ruler;
- Two pieces of paper for each side of your heart;
- Sticky tape for attaching a handle (optional).
First, on your scrap paper, you need to draw out your template. For this heart, I've drawn three columns, 2cm wide each, and 6.2cm in height. Then you want to draw an arch over the top - I used a drinks bottle to give me a curved shape.
Next, cut out your template. Fold your two pieces of paper, and place the template with the straight bottom edge along the fold. Lightly draw around your template, and measure out the three columns at 2cm wide by 6.2cm in height. The height of the columns is slightly longer than the width - this will give you a little more space and maneuverability later on. Do this for each piece of paper.
Cut along the edges of your columns. You should now have two arches that look a bit like this.
Next, you're going to start weaving your heart basket. Start weaving the columns by threading them through one another (e.g. in between), rather than up/under. Threading it through will give you the basket shape.
Keep threading them in and out, between the folded pieces.
Thread in the reverse order for each column. So if your first column went out/in/out, you want the next to start in/out/in.
It's a bit tricky by the last one, but using paper rather than card makes it a little more flexible. This is what it should look like when you're finished.
You should be able to open it up at the top (to put special treats inside!).
If you want, you can attach a handle at the top so you can hang your heart basket up.
You can also try making them in lots of different papers, to make these very sweet little heart baskets!
If you want to download a PDF file of this project, please visit my website here.


No comments:
Post a Comment